Set up Snowflake External OAuth
Configure External OAuth so users in your organization can connect to Snowflake using Single Sign-On (SSO) through Microsoft Entra ID.
With MCP and Entropy Intelligence, users can execute SQL directly on data product's underlying data sources, such as Snowflake. With Snowflake External OAuth, users don't need to manage Snowflake credentials or Personal Access Tokens. Instead, they sign in with their organization's identity provider (e.g., Entra ID), and the token is used to authenticate with Snowflake.
Overview
The setup involves three systems:
- Microsoft Entra ID — Acts as the identity provider, issuing OAuth tokens
- Snowflake — Trusts the Entra ID tokens via an External OAuth security integration
- Entropy Data — Orchestrates the OAuth flow and uses the token to query Snowflake
Prerequisites
- Snowflake account with
ACCOUNTADMINorSECURITYADMINrole - Microsoft Entra ID tenant with permissions to register applications
- Entropy Data organization with Owner role
Official Documentation
Snowflake's External OAuth overview covers the full protocol and configuration options. The Entra ID-specific guide provides detailed steps for Azure setups.
Key points from the official documentation relevant to Entropy Data:
- Redirect URI: The Entra ID app registration must use the Web platform flow with the redirect URI set to
https://<your-entropy-data-host>/connections/snowflake/oauth2/callback. Without this, the OAuth callback from Entra ID will fail. - Scope pattern: Snowflake uses
session:scope:<role_name>in the access token to determine which Snowflake role to activate for the session. (session:scope:is the prefix for the user-delegation flow that Entropy Data uses; thesession:role:prefix applies only to the client-credentials flow where a client authenticates as itself.) The full OAuth scope must be built as the Application ID URI followed by the scope name, e.g.,<app-id>/session:scope:DATAPRODUCT_USER. Role names are case-sensitive —DATAPRODUCT_USERanddataproduct_userare not the same. - Audience list: Set
EXTERNAL_OAUTH_AUDIENCE_LISTto your Application ID URI. This must match theaudclaim in the Entra ID token exactly, otherwise Snowflake will reject the token. - Any role mode: Set
EXTERNAL_OAUTH_ANY_ROLE_MODE = 'ENABLE'on the security integration. Without this, Snowflake only allows roles explicitly listed in the token's scope, which can cause unexpected access errors. - Blocked privileged roles: By default, Snowflake blocks
ACCOUNTADMIN,ORGADMIN,SECURITYADMIN, andGLOBALORGADMINfrom External OAuth sessions. Do not use these roles with Entropy Data — create dedicated roles likeDATAPRODUCT_USERinstead. - Network policies: Snowflake allows attaching a network policy directly to the External OAuth security integration. When set, this policy overrides any user- or account-level network policies. Consider this if your organization restricts Snowflake access by IP.
Step 1: Register an Application in Entra ID
- Go to Azure Portal → Microsoft Entra ID → App registrations → New registration
- Set the Name (e.g.,
Entropy Data Snowflake) - Set Redirect URI to:
- Type: Web
- URI:
https://<your-entropy-data-host>/connections/snowflake/oauth2/callback
- Click Register
After registration, note down:
- Application (client) ID
- Directory (tenant) ID
Create a Client Secret
- Go to Certificates & secrets → New client secret
- Add a description and choose an expiration
- Copy the Value immediately (it won't be shown again)
Configure API Permissions (App Roles / Scopes)
- Go to Expose an API
- Set the Application ID URI if not already set (e.g.,
https://entropy-data.com/<app-id>) - Click Add a scope:
- Scope name:
session:scope:DATAPRODUCT_USER(this maps to a Snowflake role) - Who can consent: Admins and users
- Display name:
Snowflake DATAPRODUCT_USER role - Description:
Access Snowflake with the DATAPRODUCT_USER role
- Scope name:
- Add additional scopes for other Snowflake roles as needed
Important: The scope name must follow the pattern
session:scope:<SNOWFLAKE_ROLE>. The role name should match the Snowflake role exactly, including case.
Step 2: Create the Snowflake Security Integration
Run the following SQL in Snowflake as ACCOUNTADMIN:
CREATE OR REPLACE SECURITY INTEGRATION ENTROPYDATA_EXTERNAL_OAUTH
  TYPE = EXTERNAL_OAUTH
  ENABLED = TRUE
  EXTERNAL_OAUTH_TYPE = AZURE
  EXTERNAL_OAUTH_ISSUER = 'https://sts.windows.net/<tenant-id>/'
  EXTERNAL_OAUTH_TOKEN_USER_MAPPING_CLAIM = 'upn'
  EXTERNAL_OAUTH_SNOWFLAKE_USER_MAPPING_ATTRIBUTE = 'LOGIN_NAME'
  EXTERNAL_OAUTH_JWS_KEYS_URL = 'https://login.microsoftonline.com/<tenant-id>/discovery/v2.0/keys'
  EXTERNAL_OAUTH_AUDIENCE_LIST = ('<application-id-uri>')
  EXTERNAL_OAUTH_ANY_ROLE_MODE = 'ENABLE';
Replace:
<tenant-id>with your Entra ID tenant ID<application-id-uri>with the Application ID URI from Step 1 (e.g.,https://entropy-data.com/f5e3fa44-...)
Important:
EXTERNAL_OAUTH_AUDIENCE_LISTmust match theaudclaim in the Entra ID token, which is the Application ID URI.
Configure User Mapping
Snowflake maps the upn claim from the Entra ID token to the Snowflake user's LOGIN_NAME. Ensure each Snowflake user's LOGIN_NAME matches their Entra ID UPN.
Grant Roles to Users
Users need the Snowflake role that corresponds to the scope in the token:
GRANT ROLE DATAPRODUCT_USER TO USER JOCHEN;
Step 3: Configure Entropy Data
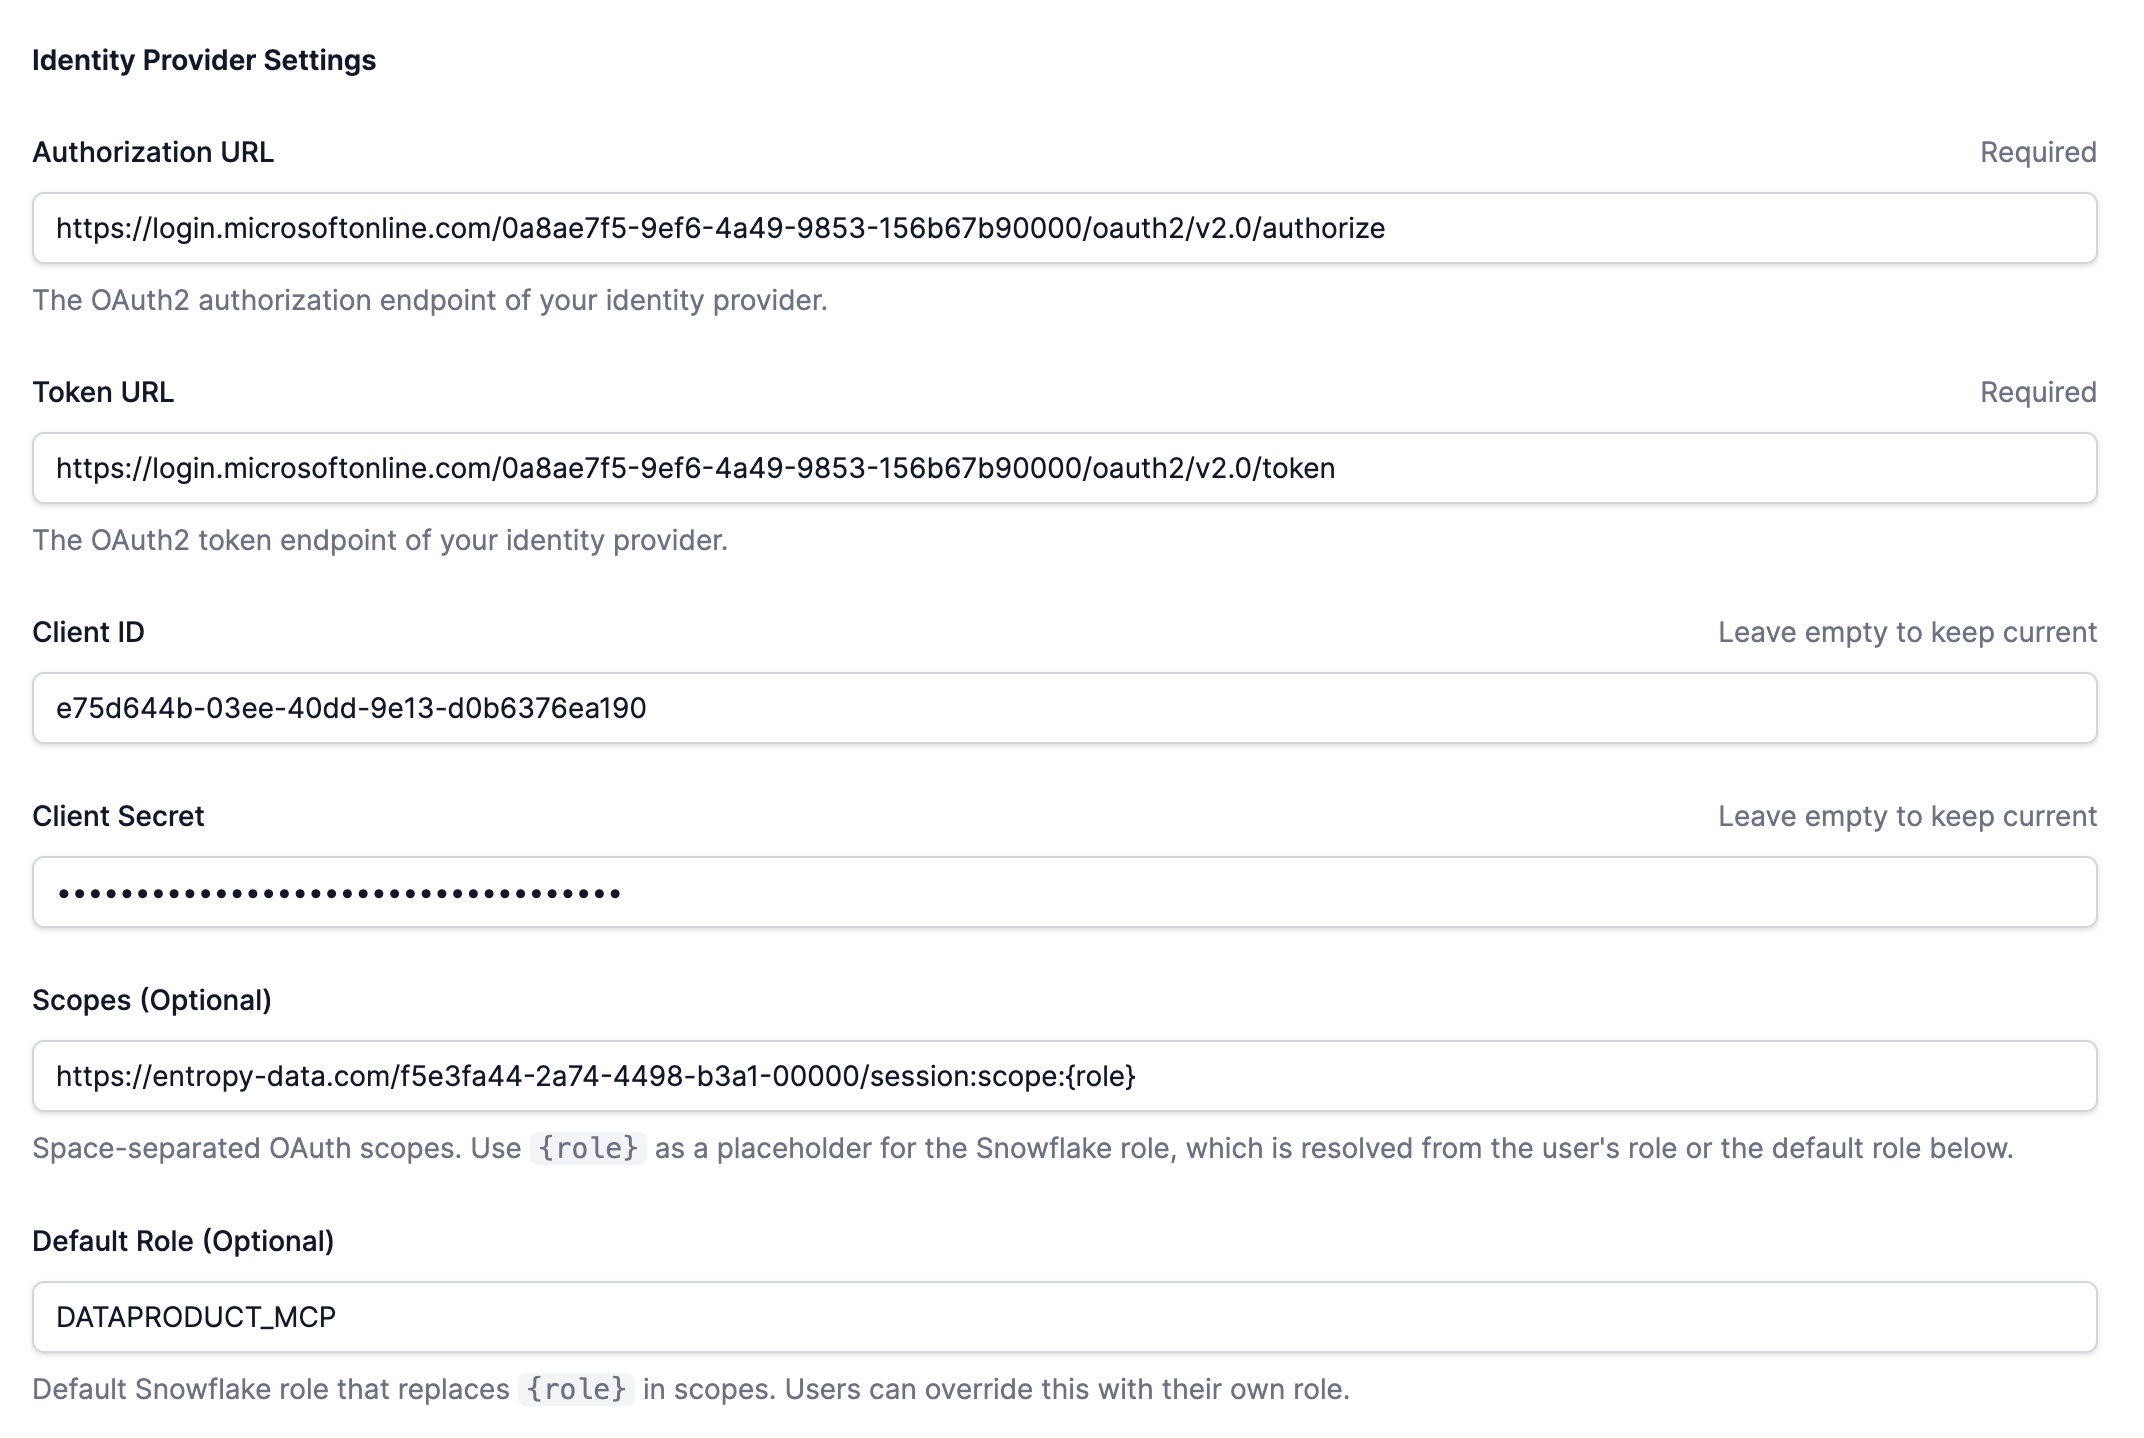
Organization Settings
- Navigate to Organization Settings → Integrations
- In the Data Access Configuration section, click Add Configuration → Snowflake External OAuth
- Fill in the form:
| Field | Value | Example |
|---|---|---|
| Name | Descriptive name | Snowflake External OAuth |
| Snowflake Account | Your Snowflake account identifier | orgname-accountname |
| Authorization URL | Entra ID authorize endpoint | https://login.microsoftonline.com/<tenant-id>/oauth2/v2.0/authorize |
| Token URL | Entra ID token endpoint | https://login.microsoftonline.com/<tenant-id>/oauth2/v2.0/token |
| Client ID | Application (client) ID from Step 1 | |
| Client Secret | Client secret value from Step 1 | |
| Scopes | OAuth scopes with {role} placeholder | https://<app-uri>/session:scope:{role} |
| Default Role | Default Snowflake role (uppercase) | DATAPRODUCT_USER |
Important: The Scopes field supports a
{role}placeholder that is replaced at runtime with the user's role or the default role. The scopeoffline_accessis automatically prepended for token refresh support.
Important: The Default Role must be uppercase to match the Snowflake role name exactly.
User Connection
Users can also connect directly from Entropy Intelligence when querying a Snowflake data product. A Sign in with SSO button appears automatically when External OAuth is configured.
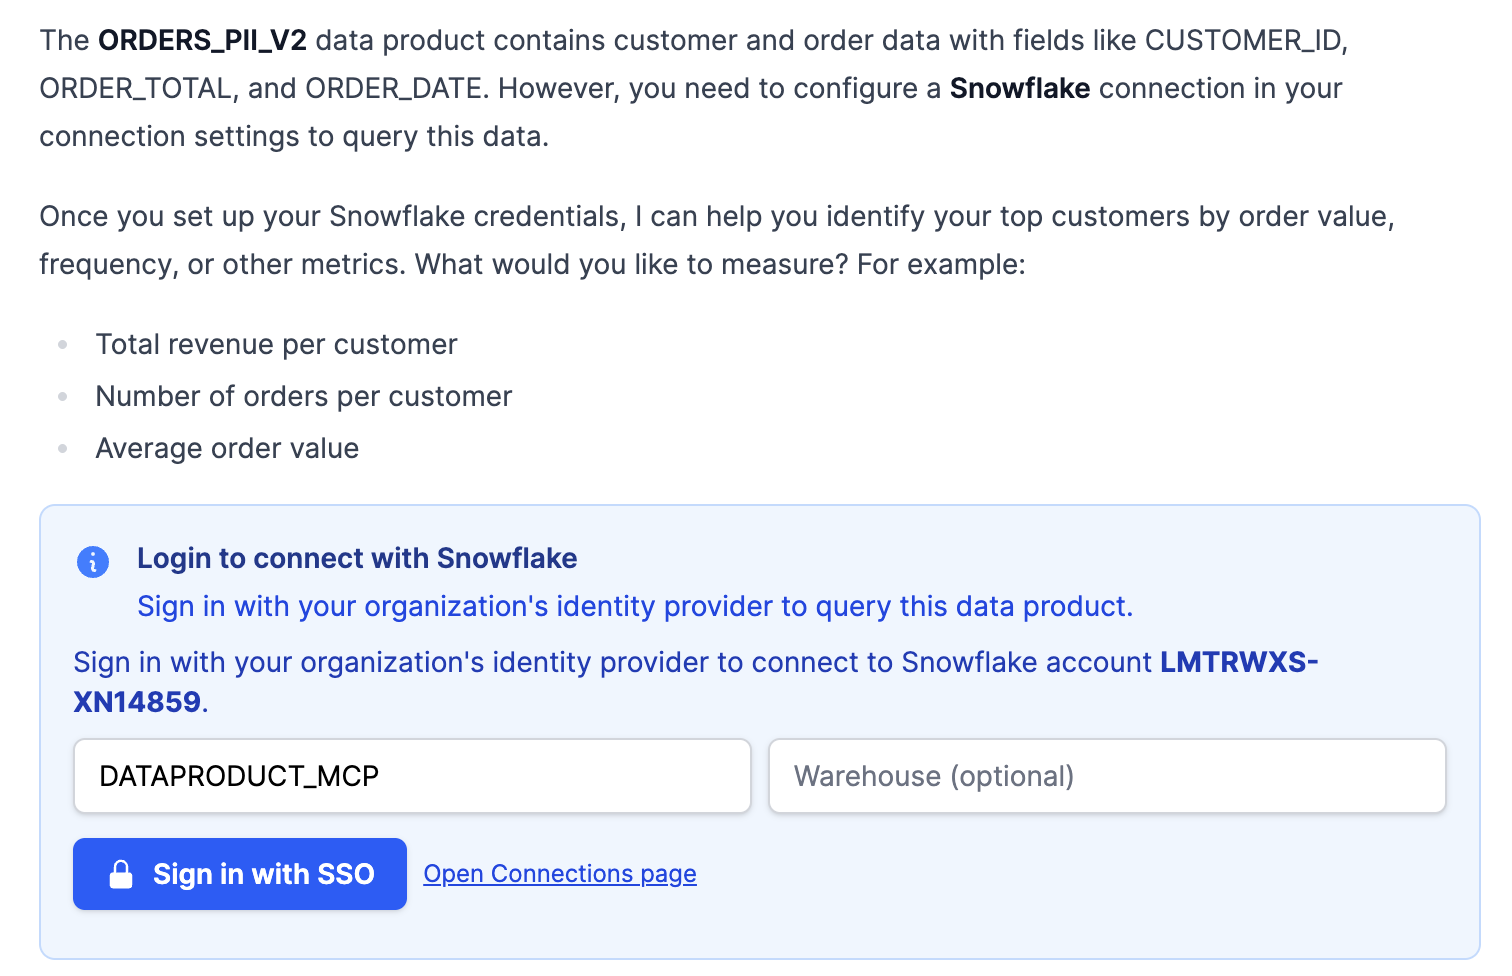
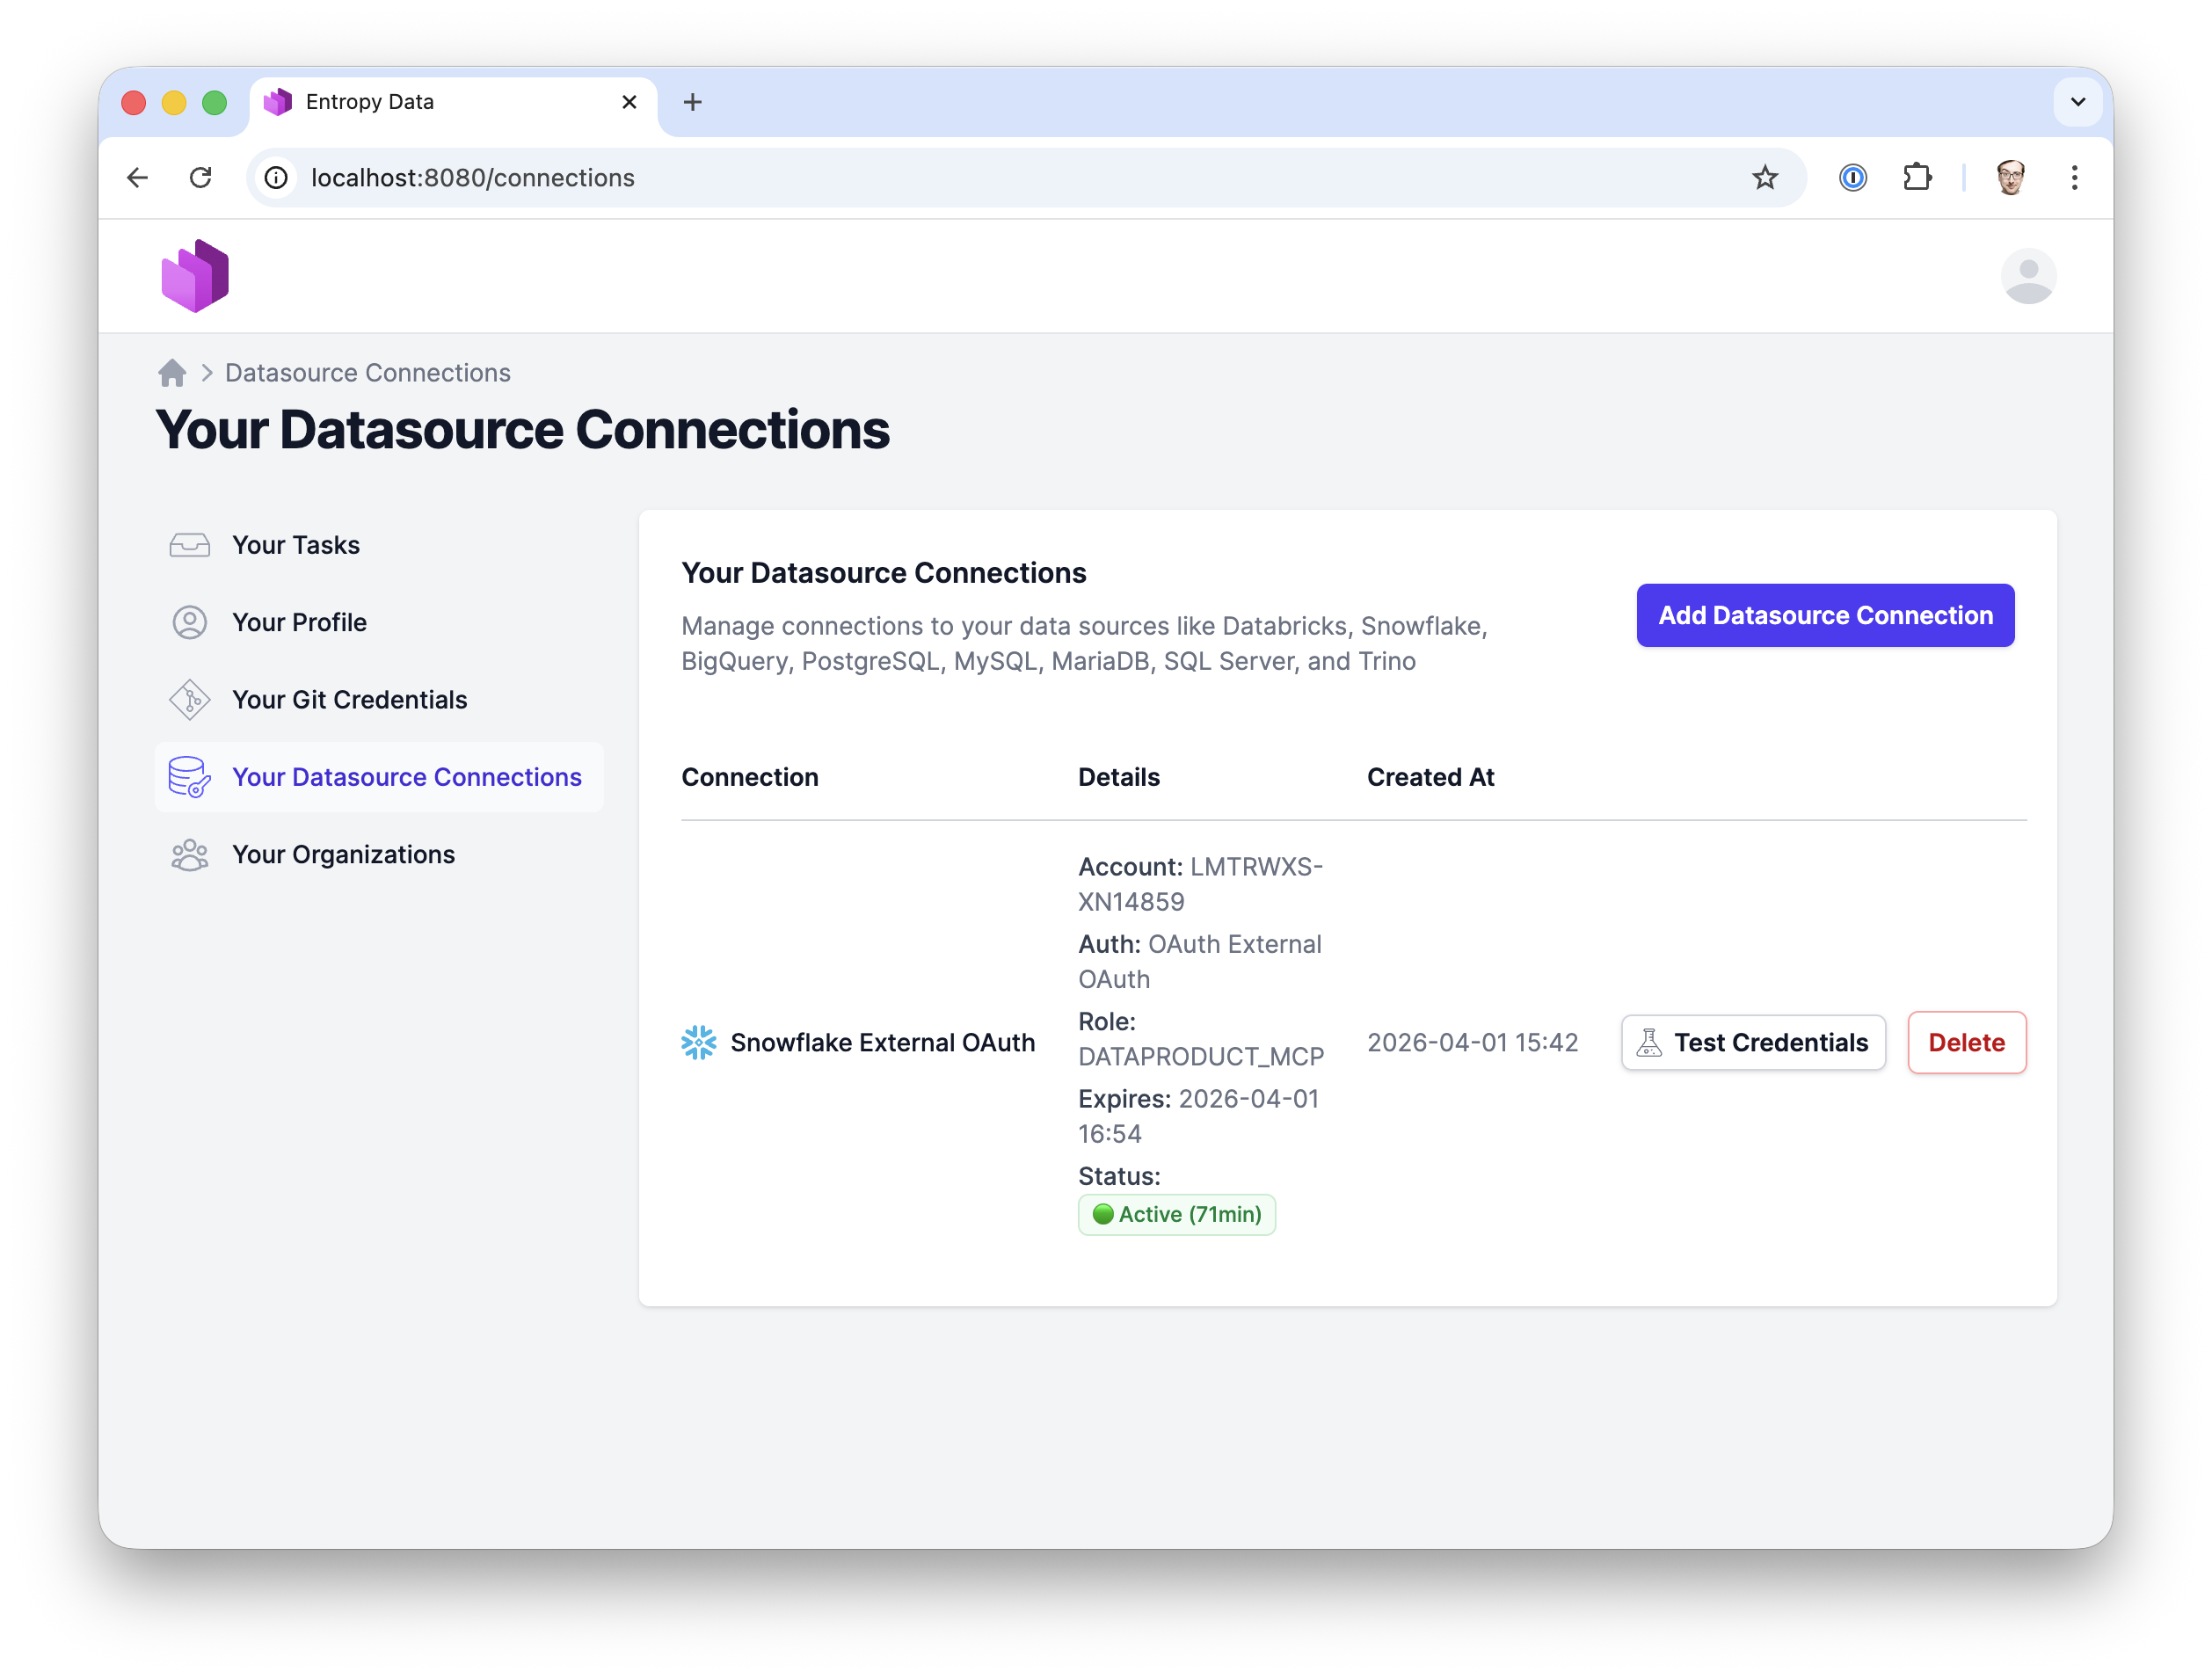
Once the organization configuration is in place, users can manually add an External OAuth connection to Snowflake to test the integration:
- Navigate to Your Datasource Connections → Add
- Select Snowflake → External OAuth
- Select the organization's External OAuth configuration
- Optionally override the role and warehouse
- Click Save — you'll be redirected to Entra ID to sign in
- After sign-in, the connection is established
Troubleshooting
Token validation
Use Snowflake's SYSTEM$VERIFY_EXTERNAL_OAUTH_TOKEN function to check if a token is valid. For login failure details, administrators with MONITOR privileges can call SYSTEM$GET_LOGIN_FAILURE_DETAILS with the error UUID from the Snowflake login history.
Decode the token at jwt.ms to inspect claims like aud, iss, and scp.
Error 390303: Invalid OAuth access token
The token is not trusted by Snowflake. Check:
EXTERNAL_OAUTH_AUDIENCE_LISTmatches theaudclaim in the tokenEXTERNAL_OAUTH_ISSUERmatches theissclaim in the token- The security integration is
ENABLED = TRUE
Decode the token at jwt.ms to inspect the claims.
Error 390317: Role not listed in the Access Token
The token's scope doesn't include the requested role. Check:
- The scope in Entropy Data includes the correct role (e.g.,
session:scope:DATAPRODUCT_USER) - The Entra ID app has the scope defined under Expose an API
EXTERNAL_OAUTH_ANY_ROLE_MODE = 'ENABLE'is set on the security integration
Error 390186: Role not granted to this user
The Snowflake role exists but isn't assigned to the mapped user. Check:
- The role is granted:
GRANT ROLE <ROLE> TO USER <USERNAME>; - The role name case matches exactly (Snowflake roles are case-sensitive when quoted)
User mapping fails
The Entra ID upn claim doesn't map to a Snowflake user. Check:
- The Snowflake user's
LOGIN_NAMEmatches theupnclaim:DESCRIBE USER <username>; - Case must match — update with
ALTER USER <username> SET LOGIN_NAME = '<upn>';
Token refresh fails
Ensure:
- The scope includes
offline_access(added automatically by Entropy Data) - The Entra ID app allows refresh tokens