Git Integration
Introduction
The Git Integration feature allows you to connect Entropy Data with your Git repositories to import and synchronize data contracts (Git support for other resources coming soon). This feature streamlines the management of data contracts by leveraging your existing Git workflows and provides a seamless way to keep your data contracts in sync between your code repositories and Entropy Data.
Currently, Entropy Data supports the following Git Connection Types:
- GitHub
- GitLab
- Azure DevOps
- Bitbucket Cloud
This guide covers how to configure Git credentials at different levels, how to customize Git settings such as commit messages and branch names, and how to import and manage data contracts from Git repositories.
Credential Resolution Hierarchy
Entropy Data resolves Git credentials using a three-level hierarchy. When a Git operation is performed, the system looks for credentials in the following order and uses the first match:
- User credentials — Personal access tokens configured in the user's profile. This is the highest-priority level and allows individual users to authenticate with their own identity.
- Team credentials — Tokens configured on the team that owns the resource. If no user credentials are found, the system walks up the team hierarchy (from the owning team through its parent teams) looking for matching credentials.
- Organization credentials — Tokens configured in the organization settings. This is the fallback level used when neither user nor team credentials are available.
Credentials are matched by Git connection type (e.g. GitHub, GitLab) and host. The first matching credential found at the highest-priority level is used.
For operations triggered via the API, the credential resolution starts at the scope level of the API key. A user-scoped API key resolves credentials starting at the user level, a team-scoped key starts at the team level, and an organization-scoped key uses only organization credentials.
This hierarchy lets you set up a flexible authentication strategy: configure organization-wide credentials as a baseline, override them for specific teams that need access to different repositories, and let individual users authenticate with their personal tokens when fine-grained attribution is required.
Configuring Git Credentials
Organization-Level Credentials
Organization credentials serve as the default fallback for all Git operations within your organization.
- Navigate to Organization Settings by clicking on the profile icon in the top-right corner and selecting (Organization) Settings
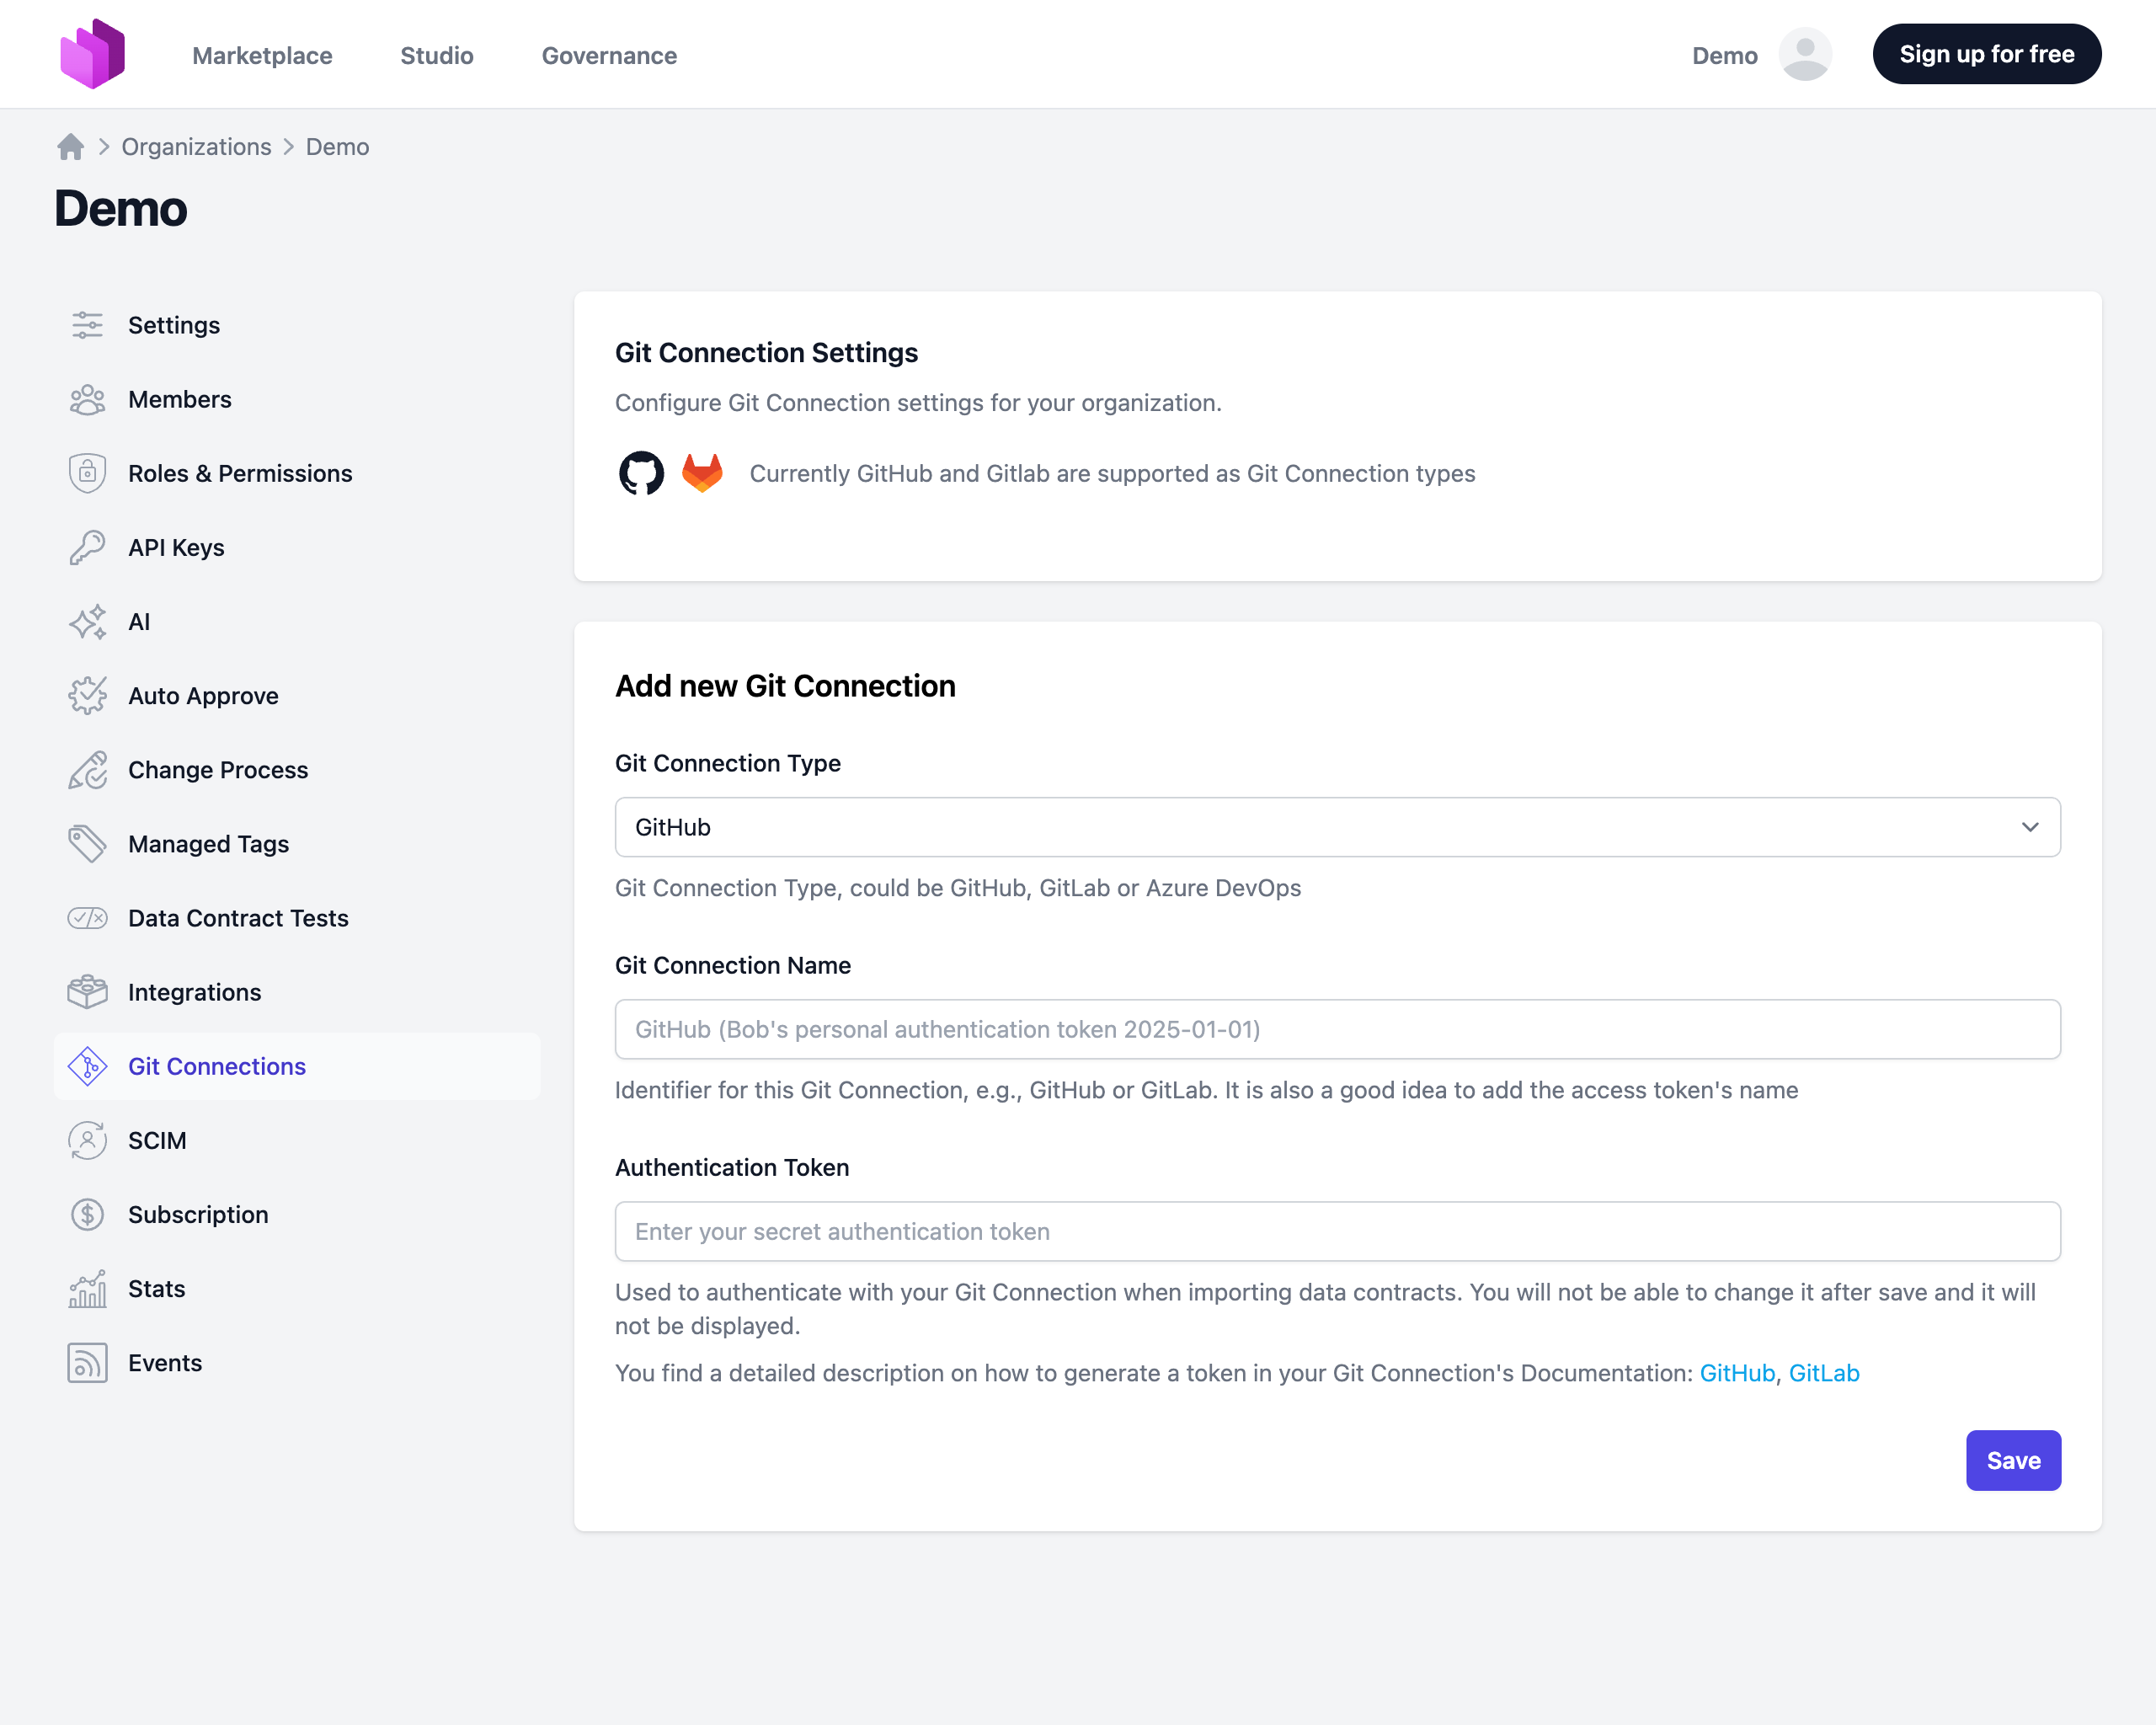
- Go to the Git Connections section
In the Git Credentials card, click Add Git Credential and fill in:
- Git Connection Type: Choose GitHub, GitLab, Azure DevOps, or Bitbucket Cloud
- Host (for GitLab and Azure DevOps only):
- For GitLab: The hostname of your GitLab instance (e.g.,
https://gitlab.comfor GitLab.com orhttps://gitlab.example.comfor self-hosted) - For Azure DevOps: Include your organization in the URL (e.g.,
https://dev.azure.com/your-organizationfor Azure DevOps Services orhttps://azuredevops.company.com/your-organizationfor self-hosted Azure DevOps Server) - For Bitbucket Cloud: No host configuration is needed as it always connects to
bitbucket.org
- For GitLab: The hostname of your GitLab instance (e.g.,
- Connection Name: Enter a descriptive name that will help you identify this credential
- Authentication Token: Enter a Personal Access Token (PAT) for your chosen connection type. The token must have the necessary permissions to access the repositories you want to use. For push functionality, write permission is required; otherwise, read access is sufficient.
- Authorization on organisation level (optional): When checked, the token is stored and used as the organization-level fallback. When unchecked, no organization-level token is stored for this connection type and teams or users must provide their own credentials.
After filling in the details, click Create to store the credential. Once saved, the token is no longer visible in the interface for security reasons.
Team-Level Credentials
Team credentials allow you to configure Git authentication for a specific team, overriding the organization-level credentials. This is useful when different teams need access to different repositories or Git providers.
- Navigate to the team's detail page
- Scroll to the Git Integration section
Click Add Credentials and fill in:
- Git Connection Type: Choose the Git provider
- Host (for GitLab and Azure DevOps only): The hostname of your instance
- Connection Name: A descriptive name for this credential
- Personal Access Token: The token to use for this team
You can test the connection before saving by clicking Test Connection. Click Create to store the credential.
Team credentials are inherited by child teams. If a child team does not have its own credentials for a given Git provider, the system walks up the parent team chain until it finds a matching credential or falls back to the organization level.
Managing team Git credentials requires the Team Edit permission.
User-Level Credentials
Users can configure their own personal access tokens in their user profile. When set, these take the highest priority and ensure that Git operations are attributed to the individual user.
User-level credentials can be configured in the user profile settings under the Git section.
Personal Access Token Links
Here are links to the documentation for creating Personal Access Tokens for each Git Connection type:
- GitHub: Creating a Fine-grained Personal Access Token. A fine-grained token is recommended. Select the repositories you want to access and ensure the token has read and write access to the
Contentsscope. Alternatively, you can use a classic token withreposcope. - GitLab: Creating a Personal Access Token. The token needs to have
apiscope for access.read_repositoryandwrite_repositoryscopes are optional but recommended for full functionality. - Azure DevOps: Use personal access tokens. The token needs to have
Code (Read)scope for read access. For push functionality and creating pull requests, also enableCode (Read & Write)scope. - Bitbucket Cloud: For user-based authentication, we recommend an API Token linked to your Atlassian account, used together with your Atlassian account email as the username (Basic auth). Bitbucket App Passwords are still accepted in the same field but have been deprecated by Atlassian and will be permanently disabled on Jun 9, 2026 and removed on Jul 28, 2026. For service or automation use, a Bitbucket Access Token (repository, project, or workspace level) with read and write permissions can be used as a Bearer token; note that Access Tokens have no user identity, so the repository picker will not list repositories for them — paste the repository URL manually when using an Access Token.
⚠️ Important Security Note: All repositories accessible with the provided token will be available to the users within the scope of the credential (organization, team, or user). This includes repository names and YAML files contained within these repositories. Make sure to use tokens with appropriate access scopes.
Configuring Git Settings
You can customize the default commit messages, pull request titles, and branch names used when pushing changes from Entropy Data to Git. These settings are configured at the organization level in the Git Settings card on the Git Connections settings page.
Default Commit Message
The commit message used when pushing changes to Git. You can use the following template variables:
| Variable | Description |
|---|---|
{{fileName}} | The name of the file being committed |
{{currentUserName}} | The name of the user performing the action |
{{currentUserEmail}} | The email address of the user performing the action |
Default value:
Updated {{fileName}} via Entropy Data

Co-authored-by: {{currentUserName}} <{{currentUserEmail}}>
Default Pull Request / Merge Request Title
The title used when creating a pull request (GitHub, Azure DevOps, Bitbucket) or merge request (GitLab) from Entropy Data.
Default value: Entropy Data - Patch Submission
Default Branch Name
The branch name used when creating a pull request or merge request. You can use the following template variables:
| Variable | Description |
|---|---|
{{shortenedCommitHash}} | A shortened version of the commit hash |
{{unixTimestamp}} | The current Unix timestamp |
Default value: ed-submission-{{shortenedCommitHash}}-{{unixTimestamp}}
Commit Author
By default, commits that Entropy Data pushes to Git are attributed to the user who triggered the action. You can override this with a fixed Commit Author Name and Commit Author Email in the Git Settings card, which are then applied to all Git operations for the organization (auto-push, patch submissions, and direct pushes).
This is useful when commits should appear under a single service-account identity rather than each individual user's credentials.
| Field | Description |
|---|---|
Commit Author Name | Name used as the Git commit author. Leave blank to use the default (the user performing the action). |
Commit Author Email | Email used as the Git commit author. Leave blank to use the default. Must be a valid member of your Git team if your provider enforces it. |
These templates allow you to follow your team's naming conventions for branches, commits, and pull requests. All fields fall back to the defaults shown above when left empty.
Importing a Data Contract with Git
Once you've configured Git credentials, you can import data contracts from your Git repositories.
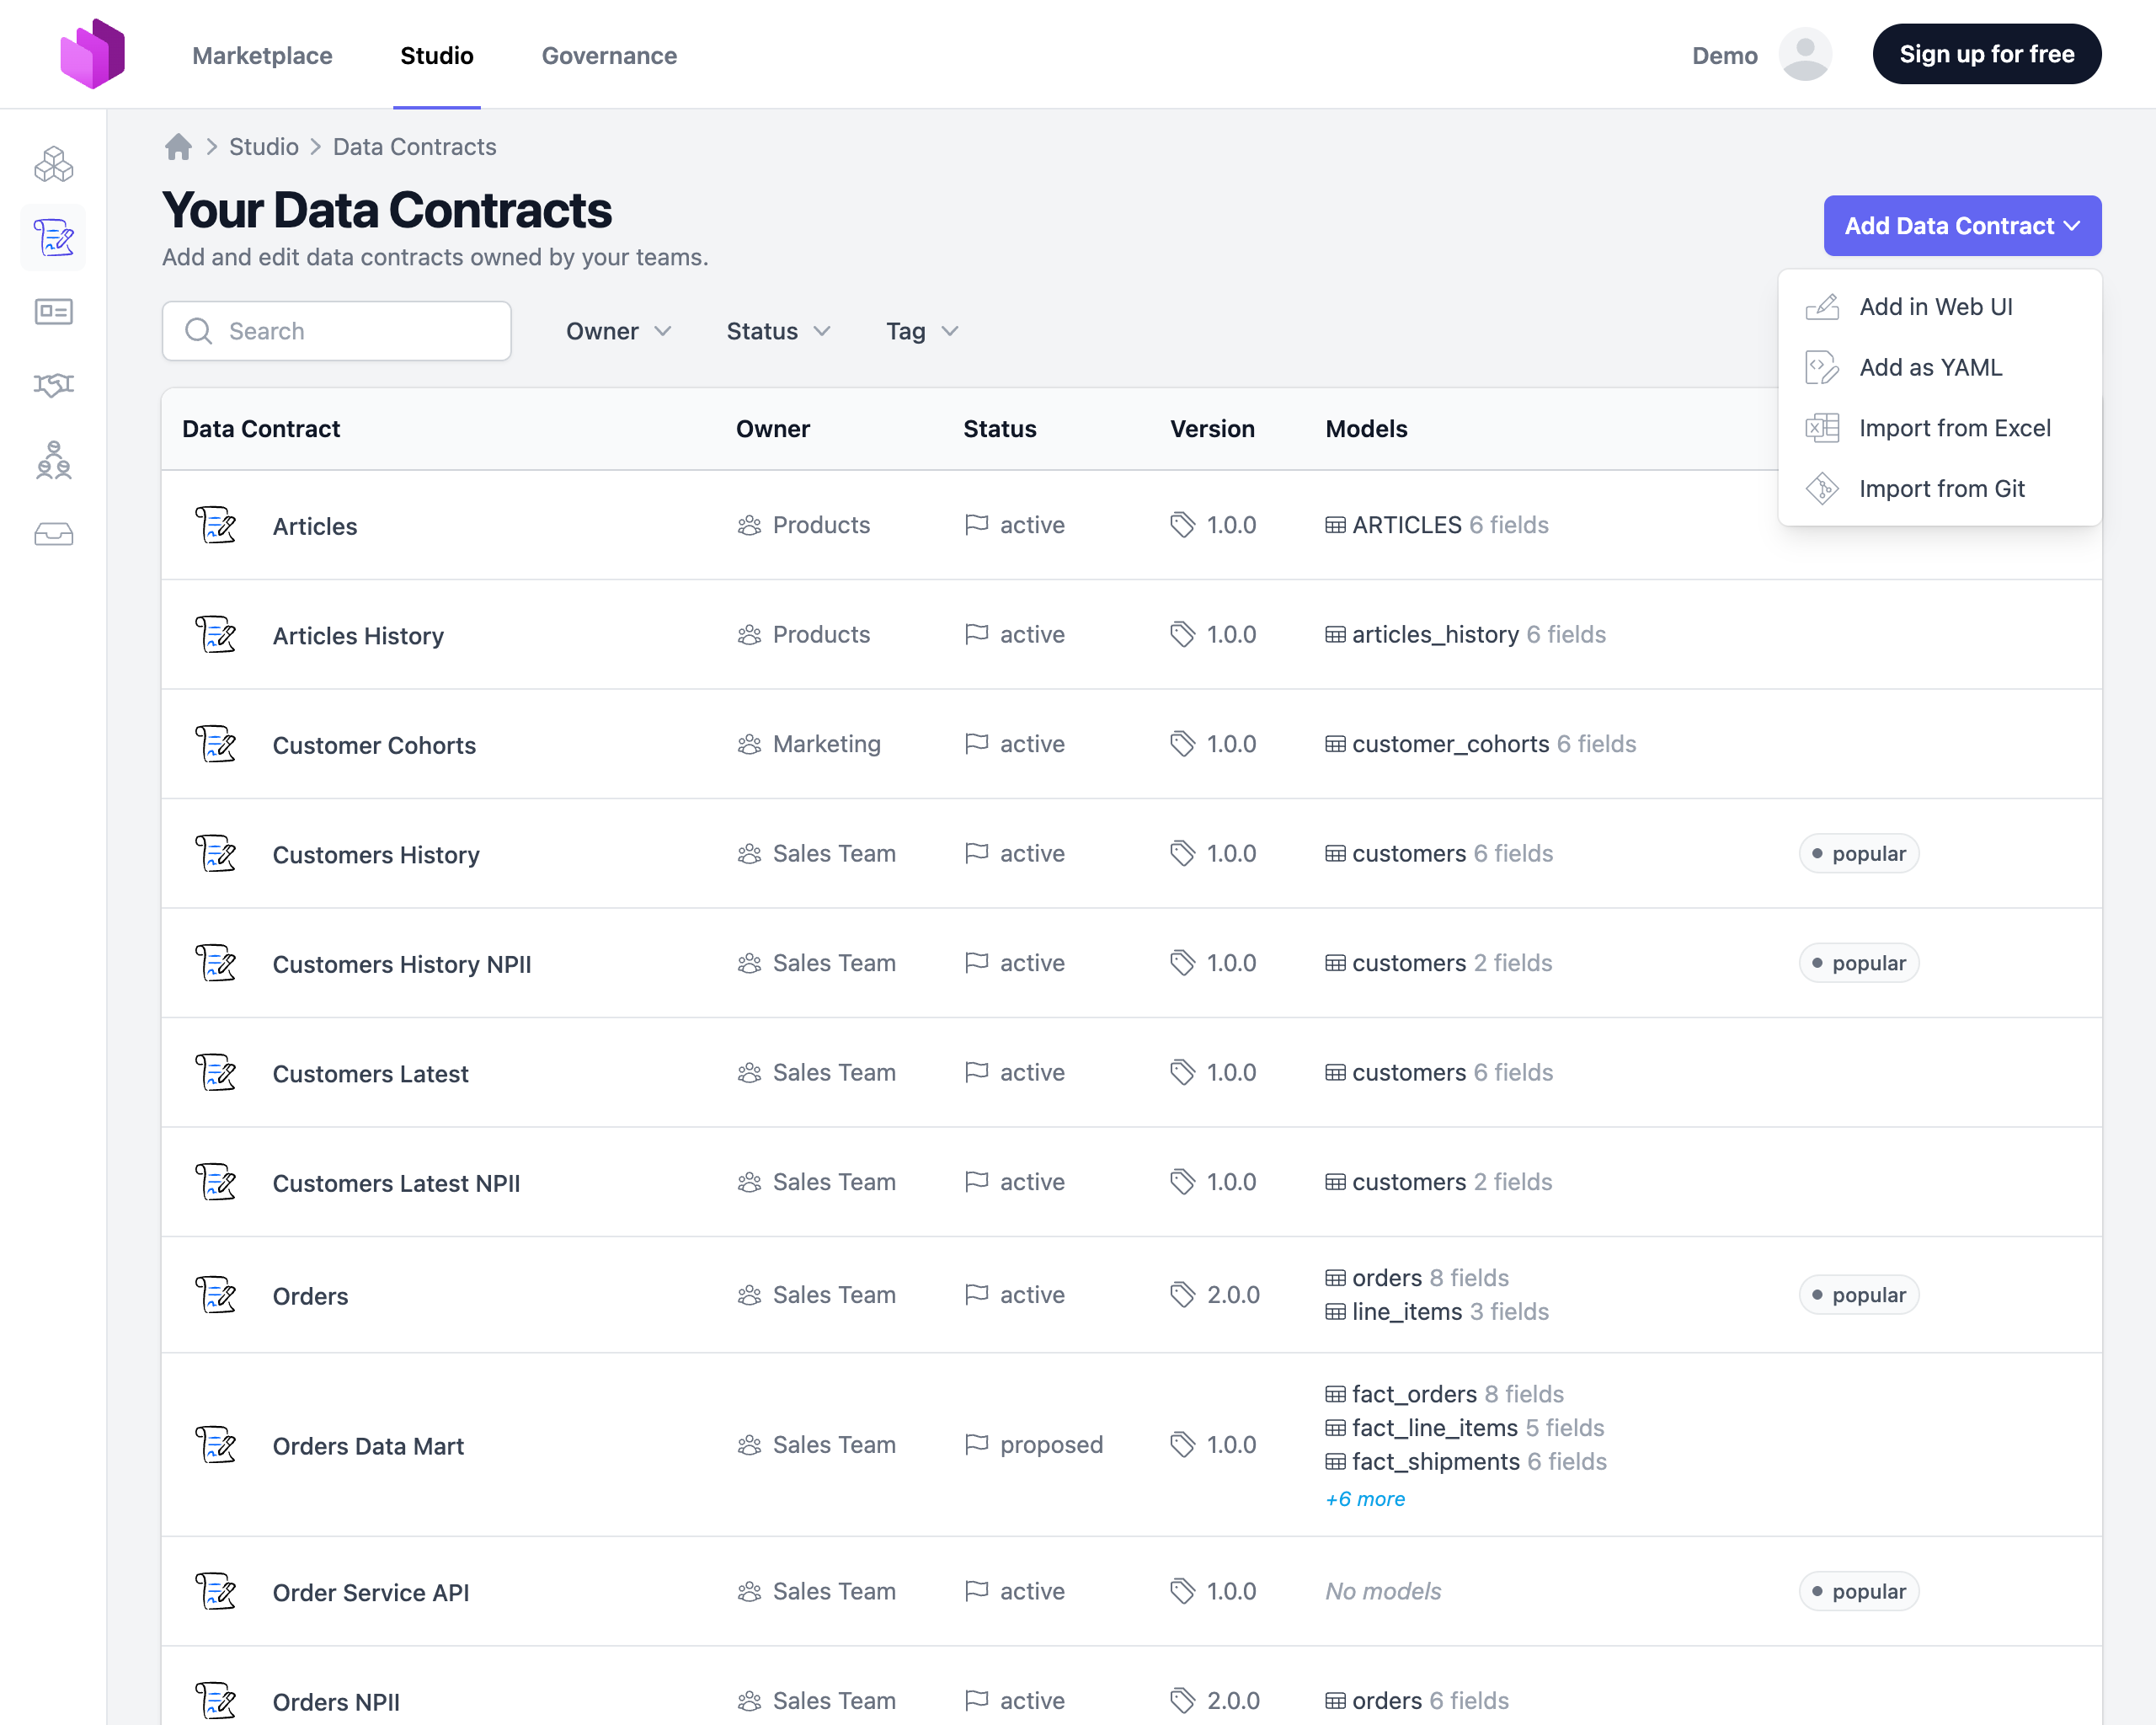
- Navigate to the Data Contracts list by selecting Studio → Data Contracts
- Click on Add Data Contract and select Import from Git
In the import form, configure the following settings:
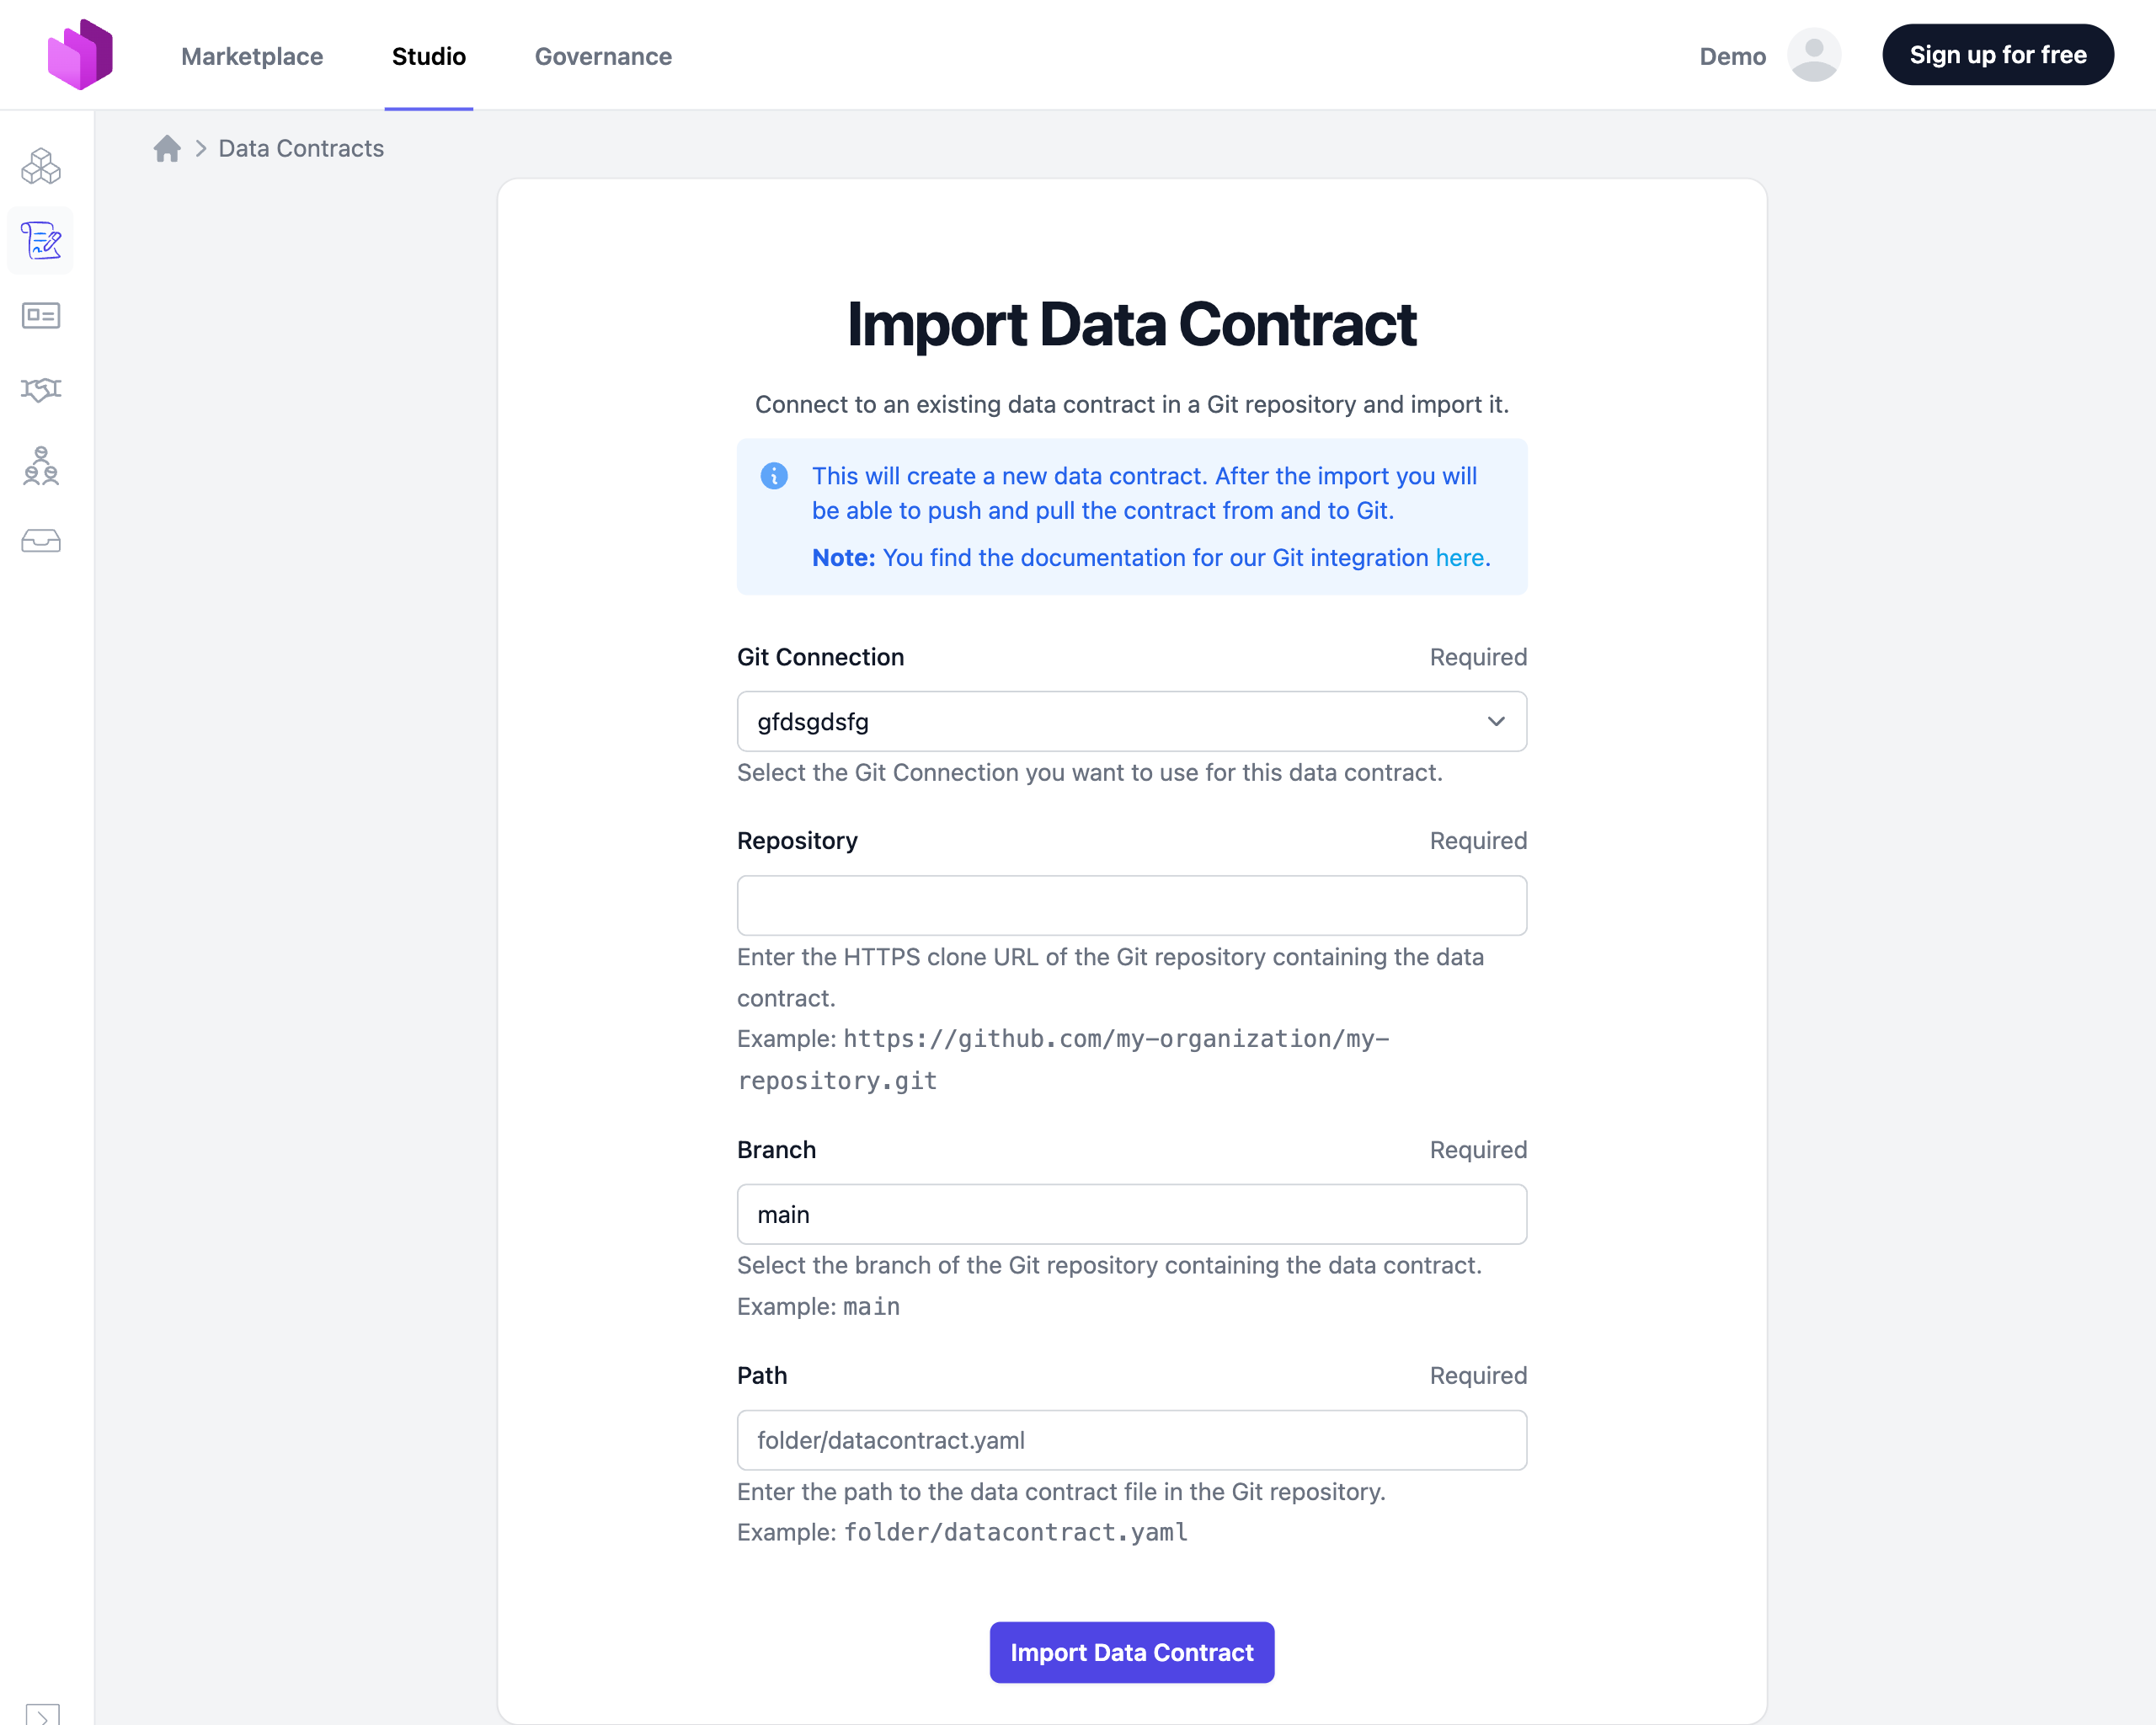
- Git Connection: Select a previously configured Git Connection from the dropdown
- Repository: Choose from the suggested repositories, or enter a known Git URL (must use the HTTPS scheme)
- Branch: Currently, only the
mainbranch is supported and is preselected - Path: Enter the path to the YAML file within the repository that you want to import
After configuring these settings, click Import Data Contract to begin the import process.
If there are any errors during import (such as file not found, incorrect credentials, etc.), these will be displayed above the form with guidance on how to resolve them.
Managing Git-Connected Data Contracts
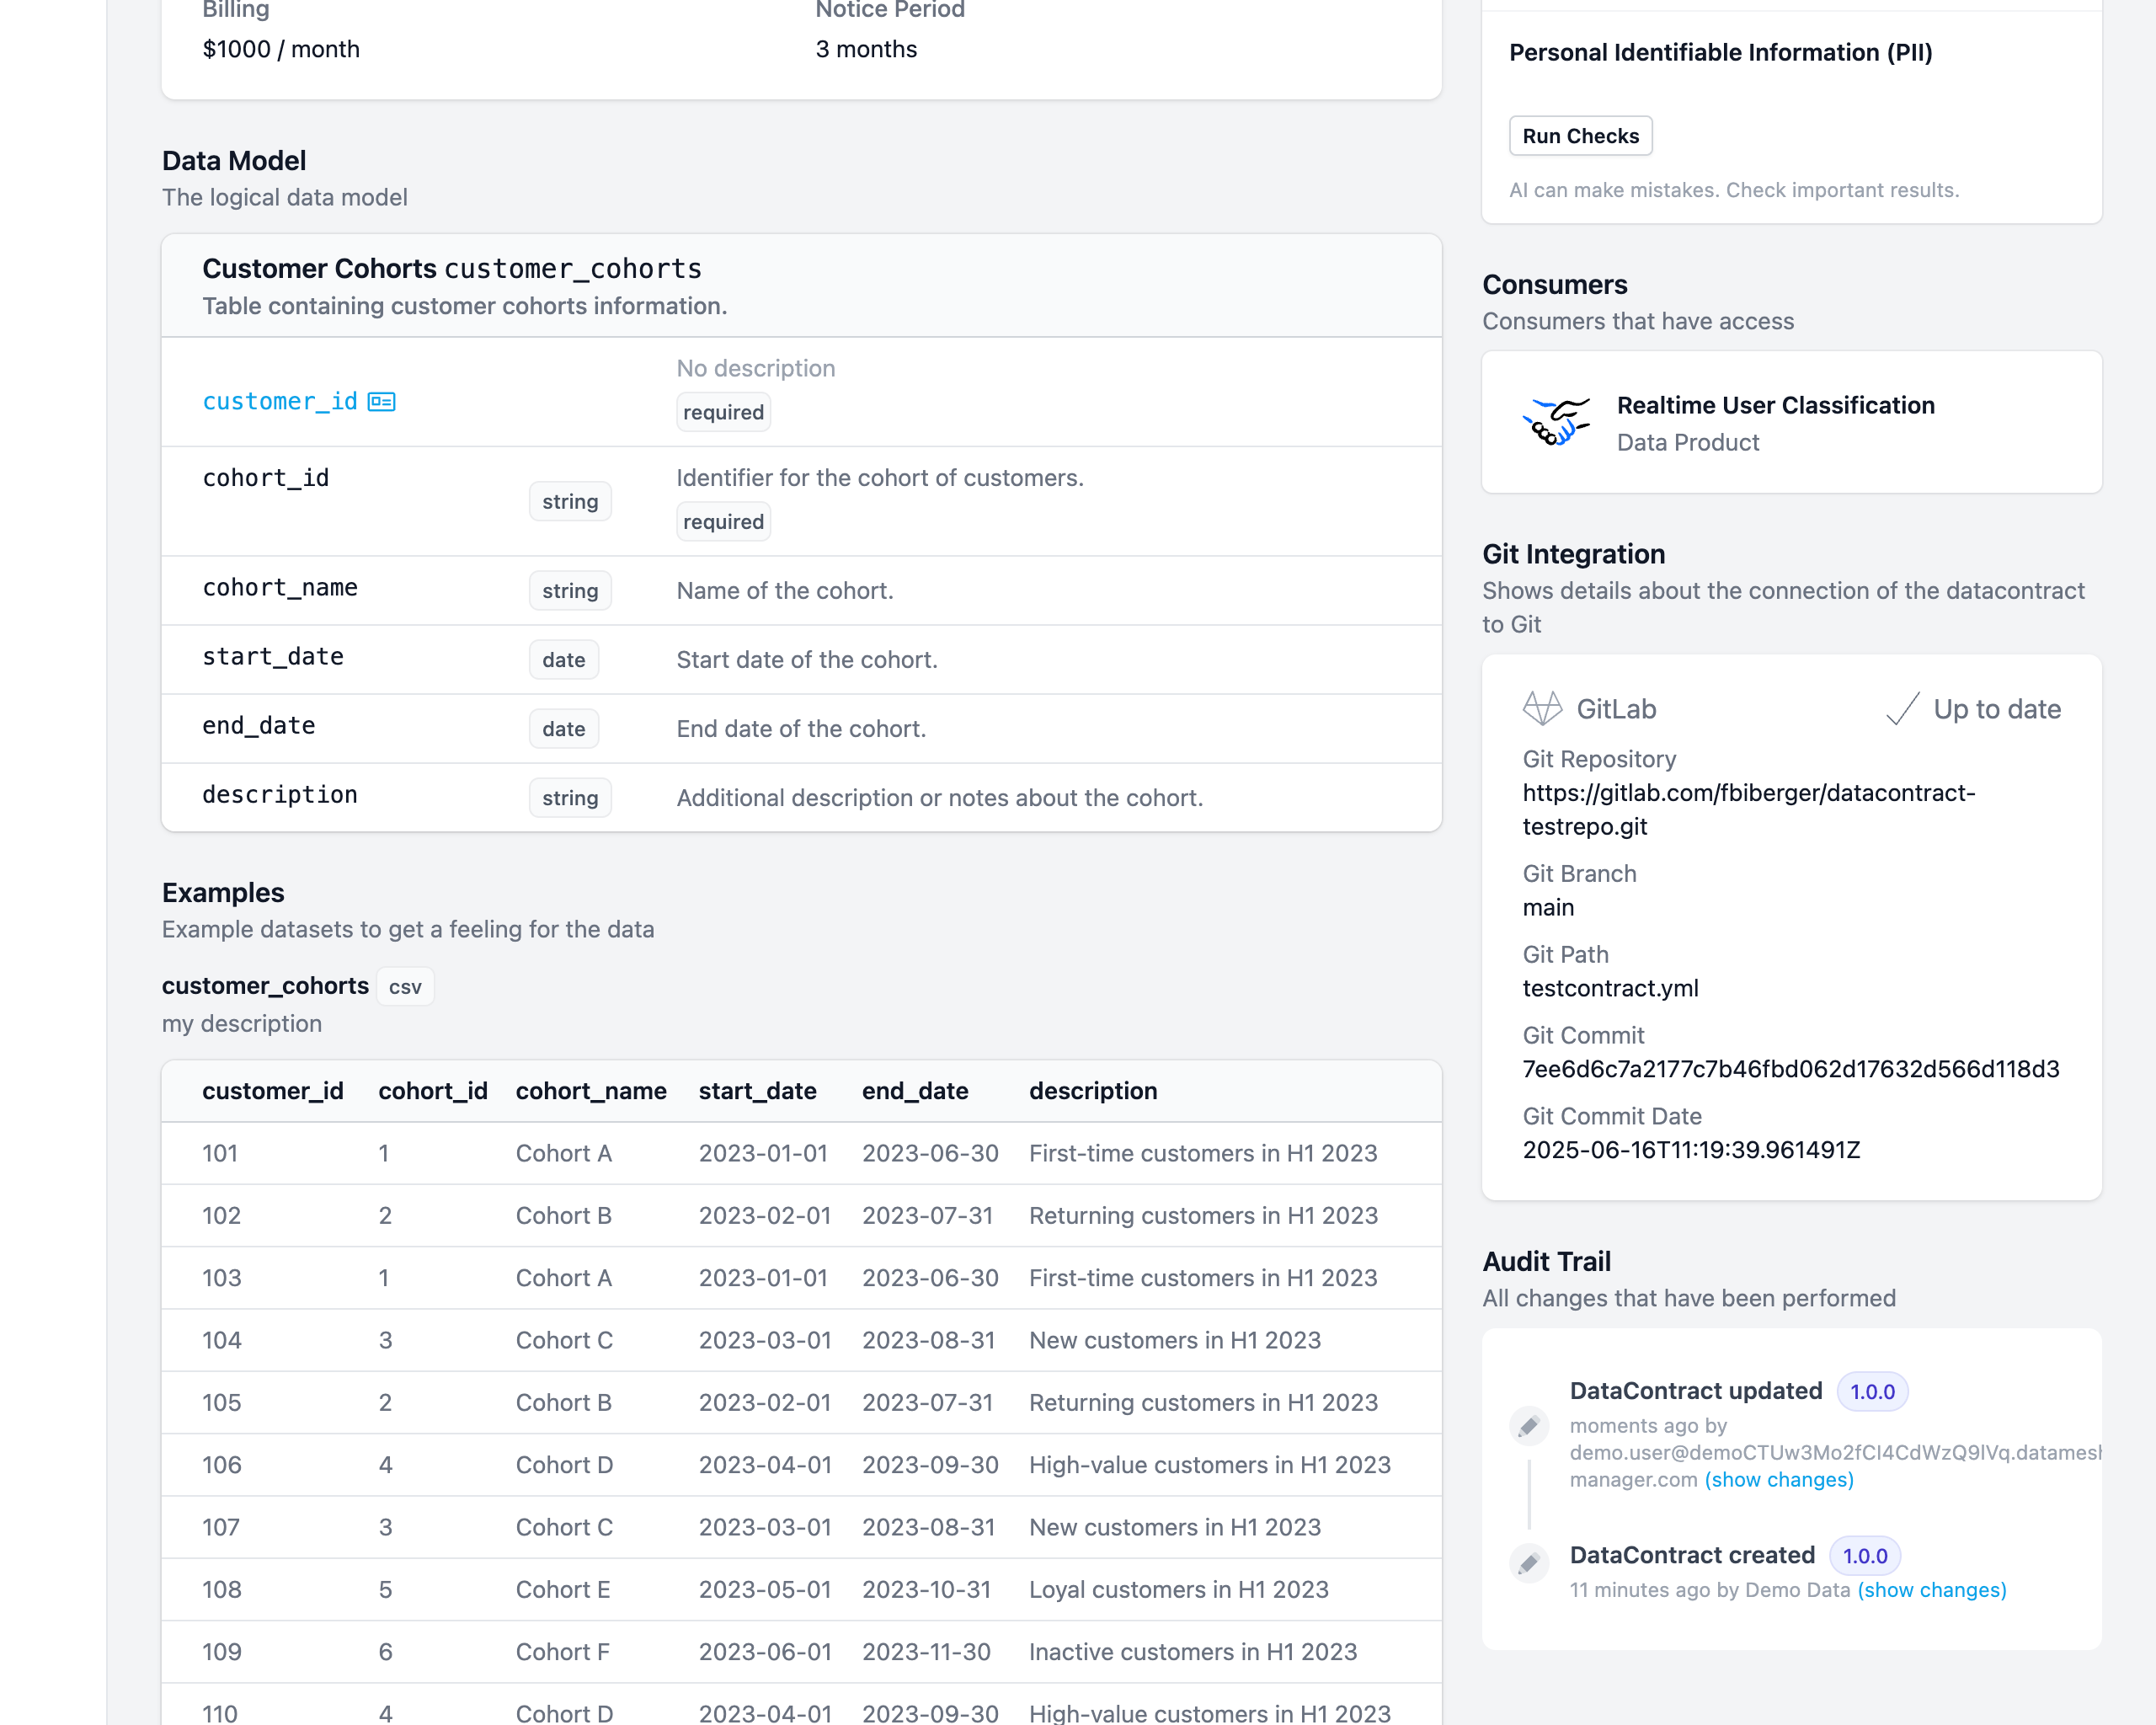
After successfully importing a data contract, you will be redirected to the newly created data contract page. For Git-connected contracts, the sidebar displays an additional card with information about the Git connection.
Synchronizing Changes
Entropy Data automatically detects changes between your Git repository and the Entropy Data platform. The Git connection card shows the current sync status:
-
Synchronized: The data contract in Entropy Data matches the version in Git.
-
File has been updated (Remote ahead): The data contract in Git has newer changes than the version in Entropy Data.
- The Git card will display a Pull button to update the Entropy Data version.
-
Changes detected (Local changes): The data contract in Entropy Data has newer changes than the version in Git.
- The Git card will display a Push... button that opens a dialog where you can choose how to push your changes (see below).
-
Conflicts detected: Both Git and Entropy Data versions have different changes.
- A Resolve button opens a dialog to help you resolve the conflict.
- Alternatively, resolve conflicts in your Git repository first, then use Pull to synchronize with Entropy Data.
-
Sync error: The connection to the Git repository could not be established. Hover over the error for details. A Retry button is available to re-check the status.
Pushing Changes
When local changes are detected, clicking Push... opens a dialog with two options:
- Push Directly: Push the changes directly to the configured branch. This option is disabled when the branch is protected.
- Create Pull Request / Merge Request: Create a new branch and open a pull request (GitHub, Azure DevOps, Bitbucket) or merge request (GitLab) for review. You can customize the PR/MR title, branch name, and commit message, which default to the templates configured in your Git Settings.
On protected branches, the pull request option is automatically preselected.
Pull Requests and Merge Requests
When you create a pull request or merge request from Entropy Data, the sync status tracks the state of that submission:
- Synchronized (with PR/MR #...): An open pull request or merge request exists and its content matches the current data contract in Entropy Data.
- Changes detected / Push to PR/MR #...: An open pull request or merge request exists but the data contract in Entropy Data has changed since the last push. You can push the updated content to the existing PR/MR branch without creating a new one.
This allows you to iterate on a data contract in Entropy Data and keep the associated pull request up to date, enabling a review-based workflow for data contract changes.
By leveraging the Git integration, you can maintain a single source of truth for your data contracts while still benefiting from Entropy Data's visualization and management capabilities.